Friday 29 May 2015

How to clip an audio file in iPhone?

Here is the method in ios that can clip an audio file(i.e MPMediaItem) with the time interval.
In below mentioned method, For time interval we are sending two parameter first is startinterval which is the interval form where we wanted to start clipping the audio file and another parameter is totalTimeInterval which is for the duration till where we need the audio to be clipped and the url path of the audio clipped will be retrieved in the block.
  1. -(void)convertAudioFileWithFile:(MPMediaItem *)song startInterval:(NSTimeInterval)startinterval
  2. totalTimeInterval:(NSTimeInterval)totalTimeInterval
  3. completion:(void(^)(NSString *urlString))callback{
  4. // set up an AVAssetReader to read from the iPod Library
  5. NSURL *assetURL = [song valueForProperty:MPMediaItemPropertyAssetURL];
  6. AVURLAsset *songAsset = [AVURLAsset URLAssetWithURL:assetURL options:nil];
  7. NSError *assetError = nil;
  8. AVAssetReader *assetReader = [AVAssetReader assetReaderWithAsset:songAsset
  9. error:&assetError]
  10. ;
  11. // set the interval
  12. CMTime start = songAsset.duration;
  13. CMTime end = songAsset.duration;
  14. start.value = start.timescale*startinterval;
  15. end.value = end.timescale*totalTimeInterval;
  16. [assetReader setTimeRange:CMTimeRangeMake(start, end)];
  17. ///////
  18. if (assetError) {
  19. NSLog (@"error: %@", assetError);
  20. return;
  21. }
  22. AVAssetReaderOutput *assetReaderOutput = [AVAssetReaderAudioMixOutput
  23. assetReaderAudioMixOutputWithAudioTracks:songAsset.tracks
  24. audioSettings: nil]
  25. ;
  26. if (! [assetReader canAddOutput: assetReaderOutput]) {
  27. NSLog (@"can't add reader output... die!");
  28. return;
  29. }
  30. [assetReader addOutput: assetReaderOutput];
  31. NSArray *dirs = NSSearchPathForDirectoriesInDomains(NSDocumentDirectory, NSUserDomainMask, YES);
  32. NSString *documentsDirectoryPath = [dirs objectAtIndex:0];
  33. NSString *exportPath = [documentsDirectoryPath stringByAppendingPathComponent:EXPORT_NAME];
  34. if ([[NSFileManager defaultManager] fileExistsAtPath:exportPath]) {
  35. [[NSFileManager defaultManager] removeItemAtPath:exportPath error:nil];
  36. }
  37. NSURL *exportURL = [NSURL fileURLWithPath:exportPath];
  38. AVAssetWriter *assetWriter = [AVAssetWriter assetWriterWithURL:exportURL
  39. fileType:AVFileTypeCoreAudioFormat
  40. error:&assetError];
  41. if (assetError) {
  42. NSLog (@"error: %@", assetError);
  43. return;
  44. }
  45. NSNumber *sampleRate = [NSNumber numberWithInt:12000.0];//[NSNumber numberWithFloat:44100.0]
  46. AudioChannelLayout channelLayout;
  47. memset(&channelLayout, 0, sizeof(AudioChannelLayout));
  48. channelLayout.mChannelLayoutTag = kAudioChannelLayoutTag_Mono;
  49. NSDictionary *outputSettings = [NSDictionary dictionaryWithObjectsAndKeys:
  50. [NSNumber numberWithInt:kAudioFormatLinearPCM], AVFormatIDKey,
  51. sampleRate, AVSampleRateKey,
  52. [NSNumber numberWithInt:1], AVNumberOfChannelsKey,
  53. [NSData dataWithBytes:&channelLayout length:sizeof(AudioChannelLayout)], AVChannelLayoutKey,
  54. [NSNumber numberWithInt:16], AVLinearPCMBitDepthKey,
  55. [NSNumber numberWithBool:NO], AVLinearPCMIsNonInterleaved,
  56. [NSNumber numberWithBool:NO],AVLinearPCMIsFloatKey,
  57. [NSNumber numberWithBool:NO], AVLinearPCMIsBigEndianKey,
  58. nil];
  59. AVAssetWriterInput *assetWriterInput = [AVAssetWriterInput assetWriterInputWithMediaType:AVMediaTypeAudio
  60. outputSettings:outputSettings]
  61. ;
  62. if ([assetWriter canAddInput:assetWriterInput]) {
  63. [assetWriter addInput:assetWriterInput];
  64. } else {
  65. NSLog (@"can't add asset writer input... die!");
  66. return;
  67. }
  68. assetWriterInput.expectsMediaDataInRealTime = NO;
  69. [assetWriter startWriting];
  70. [assetReader startReading];
  71. AVAssetTrack *soundTrack = [songAsset.tracks objectAtIndex:0];
  72. CMTime startTime = CMTimeMake (0, soundTrack.naturalTimeScale);
  73. [assetWriter startSessionAtSourceTime: startTime];
  74. __block UInt64 convertedByteCount = 0;
  75. dispatch_queue_t mediaInputQueue = dispatch_queue_create("mediaInputQueue", NULL);
  76. [assetWriterInput requestMediaDataWhenReadyOnQueue:mediaInputQueue
  77. usingBlock: ^
  78. {
  79. // NSLog (@"top of block");
  80. while (assetWriterInput.readyForMoreMediaData) {
  81. CMSampleBufferRef nextBuffer = [assetReaderOutput copyNextSampleBuffer];
  82. if (nextBuffer) {
  83. // append buffer
  84. [assetWriterInput appendSampleBuffer: nextBuffer];
  85. // NSLog (@"appended a buffer (%d bytes)",
  86. // CMSampleBufferGetTotalSampleSize (nextBuffer));
  87. convertedByteCount += CMSampleBufferGetTotalSampleSize (nextBuffer);
  88. // oops, no
  89. // sizeLabel.text = [NSString stringWithFormat: @"%ld bytes converted", convertedByteCount];
  90. // NSNumber *convertedByteCountNumber = [NSNumber numberWithLong:convertedByteCount];
  91. // [self performSelectorOnMainThread:@selector(updateSizeLabel:)
  92. // withObject:convertedByteCountNumber
  93. // waitUntilDone:NO];
  94. } else {
  95. // done!
  96. [assetWriterInput markAsFinished];
  97. [assetWriter finishWritingWithCompletionHandler:^{
  98. // callback(exportPath);
  99. }];
  100. callback(exportPath);
  101. [assetReader cancelReading];
  102. NSDictionary *outputFileAttributes = [[NSFileManager defaultManager]
  103. attributesOfItemAtPath:exportPath
  104. error:nil];
  105. NSLog (@"done. file size is %llu",
  106. [outputFileAttributes fileSize]);
  107. // release a lot of stuff
  108. [assetReader release];
  109. [assetReaderOutput release];
  110. [assetWriter release];
  111. [assetWriterInput release];
  112. [exportPath release];
  113. break;
  114. }
  115. }
  116. }];
  117. NSLog (@"bottom of convertTapped:");
  118. }

For such more Blogs you can visit to http://findnerd.com/NerdDigest
Wednesday 27 May 2015

Integrate Facebook SDK in iOS

Download Facebook SDK from following link- https://developers.facebook.com/docs/ios
Add SDK to your project. This code will help you login and get user data as well fetch friend list from specific account.
FBManager - Create a file and write the following content in FBManager.h
  1. #import <Foundation/Foundation.h>
  2. #import <FacebookSDK/FacebookSDK.h>
  3. @interface MyFBManager : NSObject{
  4. void (^completionBlock)(id data, BOOL success);
  5. }
  6. + (MyFBManager *)sharedManager;
  7. - (void)loginToFB:(void(^)(id data, BOOL result))block;
  8. - (void)getUserBasicData:(void(^)(id userValue, BOOL result))block;
  9. - (void)getMyFBFriends:(void(^)(id friends, BOOL result))block;
  10. - (void)getMyFBPictures:(void(^)(id data, BOOL result))block;
  11. - (BOOL)isAlreadyLoggedIn;
  12. - (void)logoutFromFB:(void(^)(id data, BOOL result))block;
  13. @end
FBManager.m
  1. #import "MyFBManager.h"
  2. @implementation MyFBManager
  3. static MyFBManager *myFBManager = nil;
  4. + (MyFBManager *)sharedManager{
  5. if (!myFBManager) {
  6. myFBManager = [[MyFBManager alloc]init];
  7. }
  8. return myFBManager;
  9. }
  10. - (BOOL)isAlreadyLoggedIn{
  11. return [FBSession activeSession].accessTokenData.accessToken.length?YES:NO;
  12. }
  13. - (void)loginToFB:(void(^)(id data, BOOL result))block{
  14. NSLog(@"Login in to FB");
  15. if ([[FBSession activeSession] isOpen]) {
  16. NSLog(@"session is active");
  17. block([FBSession activeSession].accessTokenData.accessToken, YES);
  18. }
  19. else{
  20. [FBSession openActiveSessionWithReadPermissions:[NSArray arrayWithObjects:@"email",@"user&#95;location",@"user&#95;groups", nil] allowLoginUI:YES completionHandler:^(FBSession *session, FBSessionState status, NSError *error) {
  21. if (error) {
  22. NSLog(@"errror==%ld==%@",(long)error.code,error.debugDescription);
  23. UIAlertView *alert = [[UIAlertView alloc] initWithTitle:@"Error"
  24. message:error.localizedDescription
  25. delegate:nil
  26. cancelButtonTitle:@"OK"
  27. otherButtonTitles:nil];
  28. [alert show];
  29. // if otherwise we check to see if the session is open, an alternative to
  30. // to the FB&#95;ISSESSIONOPENWITHSTATE helper-macro would be to check the isOpen
  31. // property of the session object; the macros are useful, however, for more
  32. // detailed state checking for FBSession objects
  33. block(nil, YES);
  34. } else if (FB&#95;ISSESSIONOPENWITHSTATE(status)) {
  35. // send our requests if we successfully logged in
  36. // [self sendRequests];
  37. NSLog(@"access token is== %@", session.accessTokenData.accessToken);
  38. block(session.accessTokenData.accessToken, YES);
  39. }
  40. }];
  41. }
  42. }
  43. - (void)sessionStateChanged:(FBSession *)session state:(FBSessionState) state error:(NSError *)error
  44. {
  45. // If the session was opened successfully
  46. if (!error && state == FBSessionStateOpen){
  47. NSLog(@"Session opened");
  48. // [self getUserBasicData];
  49. return;
  50. }
  51. if (state == FBSessionStateClosed || state == FBSessionStateClosedLoginFailed){
  52. // If the session is closed
  53. NSLog(@"Session closed");
  54. // Show the user the logged-out UI
  55. // [self userLoggedOut];
  56. }
  57. // Handle errors
  58. if (error){
  59. NSLog(@"Error");
  60. NSString *alertText;
  61. NSString *alertTitle;
  62. // If the error requires people using an app to make an action outside of the app in order to recover
  63. if ([FBErrorUtility shouldNotifyUserForError:error] == YES){
  64. alertTitle = @"Something went wrong";
  65. alertText = [FBErrorUtility userMessageForError:error];
  66. // [self showMessage:alertText withTitle:alertTitle];
  67. } else {
  68. // If the user cancelled login, do nothing
  69. if ([FBErrorUtility errorCategoryForError:error] == FBErrorCategoryUserCancelled) {
  70. NSLog(@"User cancelled login");
  71. // Handle session closures that happen outside of the app
  72. } else if ([FBErrorUtility errorCategoryForError:error] == FBErrorCategoryAuthenticationReopenSession){
  73. alertTitle = @"Session Error";
  74. alertText = @"Your current session is no longer valid. Please log in again.";
  75. // [self showMessage:alertText withTitle:alertTitle];
  76. // For simplicity, here we just show a generic message for all other errors
  77. // You can learn how to handle other errors using our guide: https://developers.facebook.com/docs/ios/errors
  78. } else {
  79. //Get more error information from the error
  80. // NSDictionary *errorInformation = [[[error.userInfo objectForKey:@"com.facebook.sdk:ParsedJSONResponseKey"] objectForKey:@"body"] objectForKey:@"error"];
  81. // Show the user an error message
  82. }
  83. }
  84. // Clear this token
  85. [FBSession.activeSession closeAndClearTokenInformation];
  86. // Show the user the logged-out UI
  87. // [self userLoggedOut];
  88. }
  89. }
  90. -(void)getUserBasicData:(void(^)(id userValue, BOOL result))block
  91. {
  92. NSLog(@"getting details here");
  93. if (![[FBSession activeSession] isOpen]){
  94. [[[UIAlertView alloc]initWithTitle:@"Please Login" message:@"Login to FB first" delegate:self cancelButtonTitle:@"Ok" otherButtonTitles:nil] show];
  95. block(nil, NO);
  96. return;
  97. }
  98. [FBRequestConnection startForMeWithCompletionHandler:^(FBRequestConnection *connection, id result, NSError *error)
  99. {
  100. block(result, error?NO:YES);
  101. }];
  102. }
  103. - (void)getMyFBFriends:(void(^)(id friends, BOOL result))block{
  104. [FBRequestConnection startForMyFriendsWithCompletionHandler:^(FBRequestConnection *connection, id result, NSError *error) {
  105. block(result, error?NO:YES);
  106. }];
  107. }
  108. - (void)uploadTheImageToFB:(UIImage *)image withTitle:(NSString *)title description:(NSString *)description completionBlock:(void(^)(id responseData, BOOL result))block{
  109. // Uploading image to user's photos on Facebook
  110. NSMutableDictionary * params = [NSMutableDictionary dictionaryWithObjectsAndKeys:[FBSession activeSession].accessTokenData.accessToken,@"access&#95;token",description, @"message",nil];
  111. if (image) {
  112. [params setObject:image forKey:@"source"];
  113. }
  114. [FBSession setActiveSession:[FBSession activeSession]];
  115. [FBRequestConnection startWithGraphPath:@"me/photos"
  116. parameters:params HTTPMethod:@"POST"
  117. completionHandler:^(FBRequestConnection *connection, id result, NSError *error) {
  118. block(result, error?NO:YES);
  119. }];
  120. }
  121. - (void)getMyFBPictures:(void(^)(id data, BOOL result))block{
  122. [FBRequestConnection startWithGraphPath:@"/me/photos"
  123. parameters:nil
  124. HTTPMethod:@"GET"
  125. completionHandler:^(
  126. FBRequestConnection *connection,
  127. id result,
  128. NSError *error
  129. ) {
  130. block(result, error?NO:YES);
  131. }];
  132. }
  133. -(void)getMyFBGroups:(void (^)(id, BOOL))block
  134. {
  135. if (![[FBSession activeSession] isOpen]){
  136. [[[UIAlertView alloc]initWithTitle:@"Please Login" message:@"Login to FB first" delegate:self cancelButtonTitle:@"Ok" otherButtonTitles:nil] show];
  137. block(nil, NO);
  138. return;
  139. }
  140. [FBRequestConnection startWithGraphPath:@"/me/groups"
  141. parameters:nil
  142. HTTPMethod:@"GET"
  143. completionHandler:^(
  144. FBRequestConnection *connection,
  145. id result,
  146. NSError *error
  147. ) {
  148. NSLog(@"result %@",result);
  149. block(result,error?NO:YES);
  150. }];
  151. }
  152. -(void)getFacebookGroupDetail:(NSString *)groupId completionBlock:(void(^)(id responseData, BOOL result))block
  153. {
  154. NSString *str=[NSString stringWithFormat:@"/%@/members",groupId];
  155. [FBRequestConnection startWithGraphPath:str
  156. parameters:nil
  157. HTTPMethod:@"GET"
  158. completionHandler:^(
  159. FBRequestConnection *connection,
  160. id result,
  161. NSError *error
  162. ) {
  163. block(result,error?NO:YES);
  164. /* handle the result */
  165. }];
  166. }
  167. - (void)logoutFromFB:(void(^)(id data, BOOL result))block{
  168. [FBSession.activeSession closeAndClearTokenInformation];
  169. block(Nil, YES);
  170. }
For such more Blogs you can visit to http://findnerd.com/NerdDigest
Tuesday 26 May 2015

Adaptive UI Concept

Adaptive UI Concept

With the launch of bigger screens of iPhones , Apple also introduced Adaptive UI concept. There are some main things you should know to work with Adaptive UI.

1) Size classes
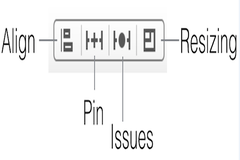
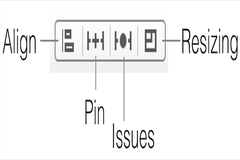
2) Align – Create alignment constraints, such as aligning the left edges of two views.
3) Pin – Create spacing constraints, such as defining the width of a UI control.
4) Issues – Resolve layout issues.
5) Resizing – Specify how resizing affects constraints.
Picture
First Size Classes
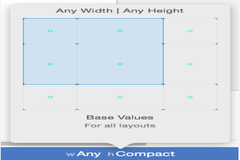
There are two type of size classes horizontal (regular or compact) and vertical (regular or compact)
Here is you can see which classes cover which device
Horizontal regular, vertical regular: iPad in either orientation
Horizontal compact, vertical regular: iPhone portrait
Horizontal regular, vertical compact: no current device
Horizontal compact, vertical compact: iPhone landscape
At the bottom of IB window , there control that allows to see which classes cover which devices.
Picture
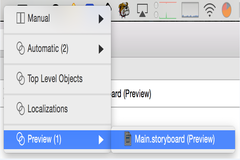
You can see the outcome of the screens on iPhone and iPad in all orientation with changes in storyboard by View->Assistant Editor -> Assistant Editor on Right and switch Assistant editor. 
Picture
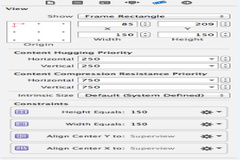
After selecting the view in storyboard ,it will list all constraint for that view in Size Inspector.
Picture
after selecting the view in the storyboard, you can see following bar at right bottom side. 
Picture
On the pressing the Align tab, you will see
Picture

Here you can set all alignment constraints with respect to its superview.
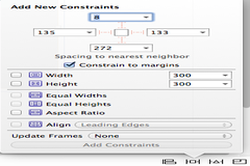
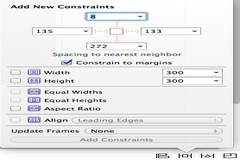
On pressing the Pin tab , you will see
Picture
By check the constrain to margins, you can set the margin of the view with its superview, also can set width and height.
For such more Blogs you can visit to 
http://findnerd.com/NerdDigest


Monday 25 May 2015

Servlet Filter

Java Servlet Filters :

Servlet filters are the classes which can intercept the request and can modify the response.

Filters are not servlets, because filters can not create the response.The purpose of using

filters are as follows :

    To intercept requests coming from a client before process it at back end.
    To modify the request headers and request data if needed.
    To manipulate responses coming from server before they are sent back to the client.
    To modify the response headers and response data if needed.

The filters can be used for filtering request, user authentication, data compression, data

encryption, image conversion, logging and auditing etc.

After creating a filter you need to deploy it in deployment descriptor file web.xml and then

map that filter to servlet name or url pattern.You can use one or more filter for one servlet.

So whenever servlet will be called first request will go to filter and then to the servlet.

A filter implements javax.servlet.Filter . A Filter class has three abstract methods which

needs to be implement :

1) void init() : The init method is used to prepare the filter for service. All the initial

configuration is set inside this method. The filter's init method called only once in the

lifetime of servlet. Syntax :

    void init(FilterConfig config) throws ServletException

2) void doFilter() : This method is the main method which provides the services. The doFilter

() method called each time when the request and response is coming. Filter's doFilter() method

receives the request and response and FilterChain containing the filter which need to be run

next. In the doFilter method you can modify the request and response object, after that filter

calls the chain.doFilter() method to transfer control to the next filter. Syntax :

    void doFilter(ServletRequest req, ServletResponse res, FilterChain chain)

3) void destroy() : This method is called by the web container to indicate that the filter is

being taken out of service. Syntex :

    void destroy()

For Example :

    package com.evon.filter.example
    import java.io.*;
    import javax.servlet.*;
    import javax.servlet.http.*;
    public class TrackTimeFilter implements Filter {
      private FilterConfig config = null;
      public void init(FilterConfig config) throws ServletException {
        this.config = config;
      }
      public void destroy() {
        config = null;
      }
      public void doFilter(ServletRequest request, ServletResponse response,
                         FilterChain chain) throws IOException, ServletException {
        long beforeRunServlet = System.currentTimeMillis();
        chain.doFilter(request, response);
        long afterRunServlet = System.currentTimeMillis();
        String name = "";
        System.out.println("Total time to run servlet is " + (after - before) + "ms");
      }
    }

Above we have created the filter, now to use this filter we need to register it in deployment

descriptor file web.xml. Following is the code sample of web.xml :

    <filter>
       <filter-name>TimerFilter</filter-name>
       <filter-class>com.evon.filter.example.TrackTimeFilter</filter-class>
       <init-param>
              <param-name>test-param</param-name>
              <param-value>Initialization Paramter</param-value>
       </init-param>
    </filter>
    <filter-mapping>
       <filter-name>TimerFilter</filter-name>
       <url-pattern>/*</url-pattern>
    </filter-mapping>

The above filter would apply to all the servlets because we specified /* in our configuration.

You can specicy a particular servlet path if you want to apply filter on few servlets only.

You can see such more blogs at http://findnerd.com/NerdDigest

Face detection with OpenCV in iOS

Hello Readers!
If you want set face detection in iOS (iPhone) follow the steps given below.
First of all we need to add opencv framework to our project. There are severel ways to do that. But the most simple is as follows:
Make framework via CMake
install home-brew first-
ruby -e "$(curl -fsSL https://raw.githubusercontent.com/Homebrew/install/master/install)"
Then install cmake with home-brew with following:
brew install cmake

After installing cmake fire following command:
=> git clone https://github.com/Itseez/opencv.git
=> sudo ln -s /Applications/Xcode.app/Contents/Developer Developer
=> python opencv/platforms/ios/build_framework.py ios

After few minutes directory in which terminal is heading, you will get /ios/opencv2.framework
Now you need to clone opencv master for your convenience. Follow URL :
https://github.com/Itseez/opencv

Now In the the downloaded folder you will find “CvEffects” xcode project which need to be included in your project. 
Now create a new Xcode project and name it as “Sample_Face_Detection” and add opencv2.framework framework to your project.
In the main.storyboard at first ViewController add one UIImageView and two button named as ’start capture’ and ’stop capture’ respectively as per your convenience.

Now add attached files in this blog to your Xcode project
1. glasses.png
2. mustache.png
3. lbpcascade_frontalface.xml
4. haarcascade_mcs_eyepair_big.xml
5. haarcascade_mcs_mouth.xml


Its time to add code for ViewController
In your viewController add following steps:
1. import these in viewcontroller.h 
  1. #import "ios.h"
  2. #import "CvEffects/RetroFilter.hpp"
  3. #import "CvEffects/FaceAnimator.hpp"


2. add videoCamera delegate like follow:
  1. @interface ViewController : UIViewController<CvVideoCameraDelegate>


3. Set data types for controller 
  1. CvVideoCamera* videoCamera;
  2. FaceAnimator::Parameters parameters;
  3. cv::Ptr<FaceAnimator> faceAnimator;


4. Add following properties:
  1. @property (nonatomic, strong) CvVideoCamera* videoCamera;
  2. @property (nonatomic, strong) IBOutlet UIImageView *imageView;
Map this imageView to you view controller Xib.

5. Add following actions
  1. -(IBAction)startCaptureButtonPressed:(id)sender;
  2. -(IBAction)stopCaptureButtonPressed:(id)sender;
Map these action to start and stop capture in view controller Xib in storyboard. 
In .m file of viewController add following code in Viewdidload:
  1. self.videoCamera = [[CvVideoCamera alloc]
  2. initWithParentView:imageView];
  3. self.videoCamera.delegate = self;
  4. self.videoCamera.defaultAVCaptureDevicePosition =
  5. AVCaptureDevicePositionFront;
  6. self.videoCamera.defaultAVCaptureSessionPreset =
  7. AVCaptureSessionPreset352x288;
  8. self.videoCamera.defaultAVCaptureVideoOrientation =
  9. AVCaptureVideoOrientationPortrait;
  10. self.videoCamera.defaultFPS = 30;
This above code will initiate CvVideoCamera with properties set to it.
  1. // Load images
  2. UIImage* resImage = [UIImage imageNamed:@"glasses.png"];
  3. UIImageToMat(resImage, parameters.glasses, true);
  4. cvtColor(parameters.glasses, parameters.glasses, CV_BGRA2RGBA);
  5. resImage = [UIImage imageNamed:@"mustache.png"];
  6. UIImageToMat(resImage, parameters.mustache, true);
  7. cvtColor(parameters.mustache, parameters.mustache, CV_BGRA2RGBA);
  8. // Load Cascade Classisiers
  9. NSString* filename = [[NSBundle mainBundle]
  10. pathForResource:@"lbpcascade_frontalface"
  11. ofType:@"xml"];
  12. parameters.faceCascade.load([filename UTF8String]);
  13. filename = [[NSBundle mainBundle]
  14. pathForResource:@"haarcascade_mcs_eyepair_big"
  15. ofType:@"xml"];
  16. parameters.eyesCascade.load([filename UTF8String]);
  17. filename = [[NSBundle mainBundle]
  18. pathForResource:@"haarcascade_mcs_mouth"
  19. ofType:@"xml"];
  20. parameters.mouthCascade.load([filename UTF8String]);
These XMLs are used to identify different parts of your face as in our example lbpcascade_frontalface.xml, haarcascade_mcs_eyepair_big.xml and haarcascade_mcs_mouth.xml is used to identify front face, both eyes and mouth during detecting your whole face respectively.
Now add following functions in your file
To start capture :
  1. -(IBAction)startCaptureButtonPressed:(id)sender
  2. {
  3. [videoCamera start];
  4. isCapturing = YES;
  5. faceAnimator = new FaceAnimator(parameters);
  6. }
To stop capture :
  1. -(IBAction)stopCaptureButtonPressed:(id)sender
  2. {
  3. [videoCamera stop];
  4. isCapturing = NO;
  5. }
CvVideoCameraDelegate function which run once face animator runs:
  1. - (void)processImage:(cv::Mat&)image
  2. {
  3. faceAnimator->detectAndAnimateFaces(image);
  4. }
Now run the code and you will find glasses on your eye pair and mustache on your upper lips. Since with the help of these XMLs app will detect you eyes and lips.


For such more Blogs you can visit to http://findnerd.com/NerdDigest
Friday 22 May 2015

HTML5 Responsive Design - Media Queries (Part 2)

In the previous session, we learnt the basics of media queries and covered some points about

how they are used to achieve responsiveness in web design. In this part, we’ll continue with

other important aspects of the same.

As we are well aware now that responsive design calls for dynamic change in design layout

based on the device conditions. This essentially means that one has to re-fit the content to

match the new resolution, dimensions, orientation etc. But before that, one should be familiar

with some important concepts. Let’s start with two and we’re going to pick others as we go

along:

1. Fluid breakpoints or simply Breakpoints -

The points at which this re-adjustment will be done. In other words, breakpoints are the

points at which we want the design to alter itself. These breakpoints are nothing but some

specific sizes and resolution at which the layout is supposed to change. Some common

breakpoints are:

    >1280 resolution

    960px resolution

    768px

    640px

    480px and 320px


2. Flexible Media Elements -

Media Elements are nothing but different types of content which needs to be re-sized, re-

fitted, re-adjusted. Since these need to change dynamically, hence the term “flexible”. Now to

implement these changes, the following needs to be factored in:

    Media Display Density

    Media View port Standard

Below I am going to elaborate on these two:

I.   Media Display Density

With the number of devices in use today with different sizes, resolutions and pixel densities,

it becomes critical to factor in these while setting the proper media query for different

screens. One of such important factors is Display Density.

Display Density or Pixel Density is basically the number of pixels you can fit in a fixed

space. This fixed space is normally measured in inches and so the unit used to define Display

Density is PPI and DPI (because sometimes pixels are also referred to as Dots). Please note

that Display Density is different from Resolution. To learn the difference, let’s take the

example of an iPhone 6 whose resolution would be 750×1334 pixels whereas its Pixel Density is

326 PPI.
What is a Pixel?

"In digital imaging, a pixel, pel, or picture element is a physical point in a raster image,

or the smallest addressable element in an all points addressable display device; so it is the

smallest controllable element of a picture represented on the screen."
-Wikipedia
Dots Per Inch (DPI)

DPI measurement is an old measure to use for 'pixel density'. It is a terminology which was

mainly used for Printing and publishing in laser and inkjet printers. Generally, normal

monitors display around 72 DPI to 120 DPI and for laptop's screen it is slightly higher. And

if we are talking about “High DPI or Retina Scale”, it is minimum 200 DPI or greater).

Below Various Display Density Constraints are describe with proper definition and meaning:-

A).Pixels density calculation – DPI / PPI

Theoretically, PPI can be calculated on the basis of the diagonal size of the screen in inches

and the resolution in pixels (width and height).
Example:

Calculating the PPI of iPhone 6:

iPhone 6 resolution = 750×1334 and Diagonal screen size = 4.7 Inches

Diagonal resolution =squareroot(750 x 750) + (1334 x 1334) = 1530.38
Now divide the diagonal resolution with diagonal screen size to get the PPI
PPI = 1530.38 / 4.7 = 325.61

B). Density Independent Pixel (DP or DiP)

An application is said to be "Density Independent" when it is able to retain the physical size

(from the user’s perspective) of media elements regardless of the screen densities.

Density Independent Pixel (DP or DiP) is an abstract value that is based on the physical

volume of the device screen and web content. A virtual pixel value that we will use when

defining any UI structure, to set layout dimensions or position in a density-independent way.

To achieve density independence, we use DP, an abstract (virtual) pixel instead of the

physical pixel. The DP is equivalent to one physical pixel on a 160 DPI screen, which is the

baseline density assumed by the system for a "medium" density screen.

C). Device Pixel Ratios

Device Pixel Ratio (DPR) is the ratio between physical pixels and device-independent pixels

(DiPs) on the device. Formula of Calculating DPR is given below:

DPR = Physical Pixels / DiPs

The method of getting DPR value of any device screen is ''window.devicePixelRatio”. A small

example of this method is given below:

        var dpr = window.devicePixelRatio;
        alert('Device Pixel Ratio: ' + dpr);


Here’s a table for DP, Device Pixel Ratio and other units:

Particulars


Lower resolution screen


Higher resolution, same size

Physical Width


1.5 inches


1.5 inches

Dots Per Inch (“dpi”) (“dpi”)


160


240

Physical Pixels (=width*dpi)


240


360

Density (factor of baseline 160)


1.0


1.5

Density-independent Pixels (“dip” or “dp” or “dps”)


240


240

Scale-independent pixels (“sip” or “sp”)


Depends on user font size settings


same

Now let’s move on to some examples to understand how Display Density plays a role in media

queries for responsive design

Examples

        @media(-webkit-min-device-pixel-ratio: 2),     /* Webkit-based browsers */
            (min--moz-device-pixel-ratio: 2),         /* Older Firefox browsers (prior to

Firefox 16) */
            (min-resolution: 2dppx),                 /* The standard way */
            (min-resolution: 192dpi)                  /* dppx fallback */


        @media  only screen and (-webkit-min-device-pixel-ratio: 1.5),
            only screen and ( min--moz-device-pixel-ratio: 1.5),
            only screen and ( -o-min-device-pixel-ratio: 3/2),
            only screen and ( min-device-pixel-ratio: 1.5),
            only screen and ( min-resolution: 192dpi ) {
                body  { color:blue; }
                .container { width:95%; }
        }

you can find such more blogs at http://findnerd.com/NerdDigest